This is a legacy form building tool and will not be supported or updated in a future product release. For a fully supported form building tool, we recommend using the Forms & Workflow (OpenForms) platform. For more information, see our article on connecting Forms & Workflow with this CMS and the Forms & Workflow help centre.
This is a System Administrator task.
Email templates can be configured to send specific content from the form to a recipient as an email or message. The template engine is used in various areas of form completion, including:
Result Processing in the Overview Screen
Email Templates: configure the email sent to a nominated recipient when a submission to the form has been received.
Submission Section in the Overview Screen
Add Auto Responser Message: Email template used when an automated email has been assigned to be sent to the Respondent upon submission of the form.
Edit Thank-You Message: Where the message displayed after the form has been submitted is configured. This message will replace the form after submission.
Configuring the Email Template Window
The template window uses HTML code and plain text to create the message text.
Type out a plain text to populate the message template and insert topical fields or tags into the message using the Select a Tag drop-down to select the required tag and clicking Insert.
These tags allow automated text to appear in the message, taken from the data entered from the submitted form. The default tags appear on every form, however, when the form is created (in the Edit tab) the field Name (or title of the field) and field Result (response submitted for the field) can also be used to customise the message.
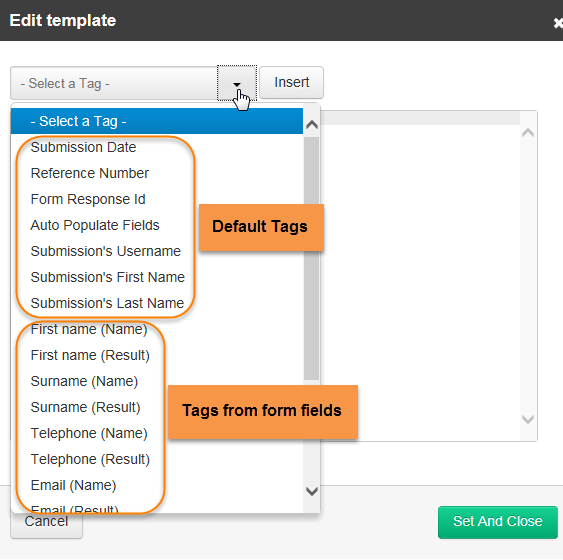
Default Tag Description
- Submission Date: Date the form response was submitted.
- Form Response ID: Unique identifier for each response.
- Auto Populate Fields: Display all fields from the form.
- Submission's Username: Username of the submitter (logged-in users only).
- Submission's First Name: First name of the submitter (logged-in users only).
- Submission's Last Name: Last name of the submitter (logged-in users only).
Select the relevant tag from the list and click Insert to make it appear in the message area.

Once complete, confirm the new template by clicking Set and Close.
Tip: Configure your email and message templates after you have set the Input Fields under the Edit tab for them to become available in the Select a Tag drop-down options.